We question whether a properly sized RV lithium inverter truly delivers dependable power under variable loads. We’ll anchor our approach in precise protection, correct wiring, and real‑world reliability, from main DC feeds and fusing to BMS interlocks and venting. We’ll verify thermal Management, enclosure integrity, and incremental load tests before documenting results. If our method holds, you’ll have a clear path to a safe, repeatable setup; but there are critical steps that can break the chain unless we stay disciplined—let’s map them out.
Key Takeaways
- Ensure proper high-current wiring from battery to inverter with appropriately rated fuses or breakers and secure, clean enclosure placement.
- Size inverter for continuous load plus surge, and plan branch circuits with correct conductors and fuses downstream.
- Set up BMS protections, charge profiles, and MPPT/shore power integration for safe, balanced lithium operation.
- Pre-check battery chemistry, venting, wiring gauge, and fuse sizing; validate solar/alternator inputs and temperature derating.
- Implement real-time monitoring, fault responses, and a step-by-step commissioning log with incremental load testing.
What Your RV Lithium Setup Delivers In Real Terms

So, what does our RV lithium setup deliver in real terms? We quantify energy delivery, runtime, and efficiency with precise benchmarks. Our system maintains stable 12V and 24V rules via BMS-locked tolerances, ensuring consistent inverter output under load. We translate amp-hours into usable daily consumption, factoring derating for temperature, wiring losses, and duty cycle. Real-world benefits include predictable weekend boondocking, minimized generator use, and faster recharge through optimized solar input and MPPT performance. We monitor voltage sag, surge tolerance, and peak draw limits to protect appliances. Aesthetics considerations and seating ergonomics influence component placement and user interaction, guiding panel alignment, cable routing, and accessible controls. In short, reliability, management clarity, and comfortable energy budgeting define our delivered capability.
Lithium vs. Lead-Acid: How To Pick The Right Chemistry For RV Duty
We’ll compare lithium and lead-acid for RV duty across battery chemistry basics, weight and longevity, and cost and availability. We’ll outline how these factors affect packing, daily usage, and lifecycle planning so you can choose the right balance for your setup. Our goal is a clear, data-driven starting point that guides practical decisions for your inverter system.
Battery Chemistry Basics
Which battery chemistry best suits RV duty depends on how you balance cost, weight, cycle life, and charging constraints. We’ll compare lithium and lead-acid in terms of reliability, performance, and serviceability, with emphasis on practical selection criteria. Our focus is on how chemistry impacts lifecycle testing, charging profiles, and overall system stability.
- Evaluate upfront costs versus total lifecycle costs, including replacement cycles and charging infrastructure.
- Assess weight and space implications, noting how higher energy density favors lithium for constrained bays.
- Define charging discipline, caveats for temperature sensitivity, and how lifecycle testing informs runtime expectations.
We present a disciplined framework: choose a chemistry that aligns with your duty cycle, maintenance tolerance, and willingness to adopt appropriate charging strategies for RV life.
Weight And Longevity
Can lithium or lead-acid deliver the best weight-to-energy ratio and lifecycle stability for RV use, and how should that guide our selection? We compare energy density, cycle life, and depth of discharge to quantify weight longevity. Lithium packs provide higher gravimetric energy density, meaning less weight for the same usable amp-hours, and longer cycle life under moderate DOD. Lead-acid suffers pronounced capacity fade and heavier ballast for equivalent runtime, increasing overall vehicle load. We evaluate battery management systems, thermal behavior, and installation constraints that influence sustained performance. Our methodical assessment emphasizes predictable discharge curves, temperature tolerance, and safe charging practices to maximize weight longevity. The result: lithium chemistry, when properly managed, drives efficiency by maintaining capacity with less weight, reducing HVAC and support requirements.
Cost And Availability
What governs the choice between lithium and lead-acid for RV duty is a clear trade-off between upfront cost, long-term Total Cost of Ownership (TCO), and immediate availability. We quantify cost and availability by examining the upfront price, cycle life, and replacement needs, then map these to our supply chain risk. We prioritize predictable performance and ensure a steady supply of core components.
1) upfront cost vs. lifecycle value
2) TCO drivers: replacements, efficiency, and charging profiles
3) supply chain resilience and regional availability
We’ll weigh cost availability and supply chain stability against our duty cycle, esp. in remote locations. Our approach emphasizes data-driven decisions, minimizing downtime while keeping option paths open for future upgrades.
How To Size An RV Inverter For Peak And Daily Loads

Sizing an RV inverter correctly means balancing peak draw with daily energy needs so the system stays reliable without overkill. We approach inverter sizing by listing anticipated loads, then applying a margin for startup spikes. We classify devices by constant, intermittent, and surge requirements, converting watts to amp-hours at the system’s nominal voltage. For peak loads, we select an inverter with a continuous watt rating safely above the highest simultaneous load, plus a surge rating to cover motor or compressor starts. Daily energy is calculated from runtime estimates, adding a modest margin for weather or accessory use. We verify battery safety margins, ensuring wiring, fusing, and thermal limits suit continuous duty. Finalize the size with a conservative headroom target to avoid nuisance trips and maintain reliability.
Choosing Battery Cells And Pack Layouts For RV Use
We start by selecting cell chemistry and form factors that meet energy, power, and thermal requirements while fitting the RV’s layout. We then evaluate cell-to-pack efficiency, voltage windows, and thermal paths to ensure reliable operation during varied ambient conditions. Our goal is a robust, serviceable pack that minimizes parasitic losses and balances capacity with weight. Critical decisions include cell chemistry suitability, module resistance, and how cells are arranged to optimize cooling. We also consider discharge rates, cycle life, and compatibility with the inverter’s DC bus. This leads to a coherent pack layout that supports safe integration and modular expansion. battery safety, pack layout.
- Choose chemistry and form factor for energy, power, and thermal demands.
- Design module geometry and interconnects for optimal cooling and access.
- Plan future expansion while preserving safety margins and serviceability.
Core Safety Gear: BMS, Fuses, Disconnects, And Protection
We’ll outline the BMS guardrails and its roles, ensuring cells stay within safe voltage and temperature limits while providing fault isolation. We’ll cover proper fusing and sizing to protect cables and components from overcurrent, and establish clear disconnects and protection schemes for rapid isolation during faults. This review sets the foundation for reliable, maintainable safety practices in the RV lithium system.
BMS Guardrails And Roles
How do we guarantee safe operation? We establish clear BMS guardrails and define each role to prevent ambiguity. We align responsibilities with safety boundaries and verify that all team members understand the limits of the system. Our approach emphasizes proactive monitoring, documented procedures, and disciplined handoffs to maintain continuous protection of cells, cables, and the inverter.
- Roles clarity ensures owners, technicians, and operators know who handles monitoring, alert responses, and system resets.
- BMS guardrails define allowable voltage, current, and temperature windows, plus auto-disable triggers for fault conditions.
- Safety boundaries specify actions outside normal operation, escalation paths, and verification steps before re-energizing the system.
Proper Fusing And Sizing
A robust fusing and sizing strategy ensures the battery system remains protected under all operating conditions. We apply disciplined fuse sizing and conductor ratings to withstand surge currents, short circuits, and fault scenarios without nuisance blows. Our approach ties fuse ratings to the maximum continuous current drawn by the inverter, charging sources, and loads, with headroom for startup spikes. We select fast-acting vs. slow-blow types based on circuit behavior and wire gauge, ensuring proper voltage drop and thermal limits. We document protection levels in a single-line diagram, aligned with BMS limits and battery protection requirements.
| Aspect | Specification |
|---|---|
| Fuse type | Fast-acting / slow-blow selection by circuit |
| Current rating | Based on max load, inverter, and charging input |
Disconnects And Protection Schemes
Disconnects and protection schemes are the backbone of a safe, reliable RV battery inverter system. We implement clear separation between high- and low-current paths, verify BMS integration, and ensure fast-acting protection triggers. Our approach emphasizes predictable responses to faults, controlled shutdown sequences, and documented test procedures. We consider thermal management and vibration considerations to maintain reliability under road and camping conditions, selecting components rated for surges, humidity, and temperature variation. Properly sized disconnects prevent arc propagation and facilitate safe maintenance. We document fault hierarchies, trip curves, and recovery steps so responders act decisively.
- BMS role, interlocks, and state signaling
- Fuses, breakers, and disconnect placement with accessibility
- Environmental and mechanical considerations, including vibration and heat management
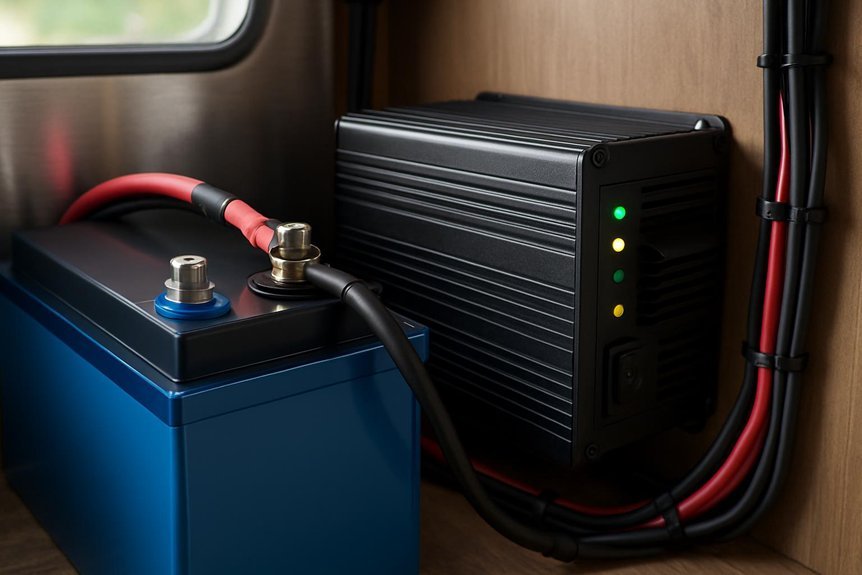
Wiring The RV System: Battery To Inverter To Loads-Step By Step
So, we’ll map the path from the battery to the inverter and then to the loads, step by step, ensuring proper polarity, gauge, and protection along the way. We connect the positive battery terminal to the inverter’s input positive with an appropriately rated fuse or breaker, close to the battery, then run a heavy gauge DC cable to the inverter. The return path follows the negative terminal to the inverter’s input negative, also protected. From the inverter’s output, we route dedicated branch circuits to loads, using appropriately sized conductors and fuses per circuit. We verify connections for tightness, torque, and cleanliness. Finally, we confirm voltage, current limits, and safe enclosure placement, noting battery maintenance and inverter sizing implications for long-term reliability.
Charging Strategies For RV Life: Shore, Solar, And Alternator
We’ll outline our charging options—shore power, solar, and alternator/Gen alternatives—and how each affects our battery management strategy. We’ll compare input rates, charging profiles, and system coordination to ensure safe, efficient charging under varying conditions. Our goal is a clear framework for selecting and integrating these sources for reliable RV lithium operation.
Shore Power Charging
Shore power charging is the simplest, most reliable way to keep an RV’s house battery bank topped up when you’re plugged into a camp electrical system. We approach this with a methodical checklist to ensure setup reliability and consistent performance.
- Verify input compatibility: confirm campground voltage, amperage, and the cord rating before connecting the shore power inlet.
- Engage safe transfer: use a properly rated connector, monitor for arcing, and verify the inverter/charger transitions cleanly from shore to battery power.
- Monitor charging profile: ensure the charger follows a calibrated bulk/absorption/float sequence and log voltage and current for diagnostics.
This approach emphasizes shore charging discipline, minimizes idle losses, and preserves lithium cell health through controlled charging dynamics.
Solar And Gen Alternatives
Do you ever wonder how solar, generator, and alternator charging compare in an RV power system? We evaluate each source’s role, efficiency, and control to balance runtime, weight, and cost. Solar provides quiet daytime replenishment, limited by panel area and sun exposure, with MPPT optimization guiding charging profiles. A generator offers steady high output but adds fuel use and noise, best for bulk replenishment during outages or extended stays. Alternator charging leverages engine running to top off batteries during travel or idle periods, with moderate efficiency and wear considerations. Coordination hinges on a smart battery charger and load management.
| Source | Key Considerations |
|---|---|
| Solar | Predictable, quiet, solar irradiance limits |
| Generator | High output, fuel, noise, maintenance |
Monitoring And Safety: What To Watch And How To Respond
Monitoring and safety are essential during RV lithium battery inverter operation. We’ll outline what to watch and how to respond, using precise, actionable steps that fit our installation mindset. We focus on practical checks, alarm handling, and documented responses to maintain reliability and safety.
- Monitor battery voltages, temperatures, and inverter input/output currents; log anomalies and escalate per predefined thresholds.
- Follow established response strategies for fault indicators, including secure shutdown procedures, heat management adjustments, and system isolation if needed.
- Verify interlocks, fusing, and enclosure integrity after any fault, then restore operation only after confirmed safe conditions and reset of alerts. Avoid cosmetic fixes; document root causes and preventive actions to uphold monitoring safety and long-term performance.
Common RV Installation Pitfalls To Avoid (With Fixes)
Have you accounted for the most common RV installation pitfalls and their fixes to prevent outages and safety concerns? We’ve identified key failure modes and will present targeted remedies. First, guarantee proper gauge wiring and fused protection; underestimating ampacity causes overheating and voltage drop. Second, avoid improper grounding and bond connections; floating grounds invite shock and EMI. Third, confirm polarity and correct polarity reversal risks before secure mounting. Fourth, manage battery charging harmonization with the inverter’s input; incompatible charging can corrode lugs and reduce efficiency. Fifth, maintain cable routing away from heat sources and moisture, using conduits where needed. RV specific caveats include airline-style stacking and venting considerations; safety reminders emphasize PPE and isolation during work. Implement fixes, test under load, and document changes for ongoing reliability.
Start-To-Finish Checklists For A Reliable RV Lithium Setup
First, we’ll lay out a comprehensive Start-To-Finish checklist that we can follow step by step to ensure a reliable RV lithium setup. We outline a disciplined sequence that prioritizes safety, accuracy, and repeatability, emphasizing lithium safety and inverter sizing to avoid overwork or underperformance. We’ll verify component compatibility, perform electrical calculations, and document all settings before tests.
We’ll follow a Step‑To‑Finish checklist to ensure a safe, accurate RV lithium setup with proper inverter sizing and thorough documentation.
1) Pre-checks: confirm battery chemistry, wiring gauge, fuse sizing, and proper venting; validate solar and alternator input limits.
2) Configuration: set charge profiles, balance cells, and configure BMS protections; ensure correct inverter sizing for loads and peak surges.
3) Validation: conduct incremental load tests, monitor temperatures, voltages, and system response; log results and adjust as needed.
Frequently Asked Questions
How Long Does a Full RV Lithium Setup Last on a Charge?
We can’t guarantee a single-life span, but our full RV lithium setup typically lasts long on a charge, depending on load; for long term duty we optimize cycles, while urban charging helps maintain capacity and reliability.
Can I Mix Different Lithium Chemistries in One System?
We can’t mix different lithium chemistries in one system due to incompatibility risks and charging mismatches; we’ll keep chemistries uniform, monitor cell balance, and follow manufacturer specs to ensure safety and reliable performance for our setup.
Is AC Inverter Sizing Affected by Motor Startup Surges?
Yes, is ac inverter sizing affected by motor startup surges; we size for peak startup current, not continuous draw. We monitor inrush, use soft-start, and verify motor startup compatibility to avoid voltage dips and component stress.
Do Lithium Setups Require Venting Like Lead-Acid Chemistries?
Yes, lithium setups generally don’t vent like lead-acid, but we still meet venting requirements for safety ventilation. We assess enclosure aeration, thermal management, and gas buildup risks, documenting vent paths and monitoring for pressure and heat.
What Maintenance Does a Lithium RV System Need?
We perform a maintenance schedule including periodic inspections, cell balance checks, firmware updates, and connector torque tests, while following safety protocols; we monitor temperatures, voltages, and SOC, and document anomalies for prompt corrective actions.
Conclusion
In the end, we’ll notice how the simple coincidence of careful wiring and disciplined testing pays off. When the battery, inverter, and BMS align—fuses sized, vents clear, temps stable—our RV runs smoothly, almost by chance. The timing of incremental loads matches our vented enclosure and thermal margins, the shore power tap confirms correct charging, and fault logs echo a predictable response. We finish with confidence, knowing safety and reliability arrived through deliberate, repeatable steps.

